Master The French Braid: Your Ultimate Guide To Elegant Hair
The French braid is more than just a hairstyle; it's a timeless statement of elegance and sophistication. For decades, this classic look has graced runways, red carpets, and everyday life, proving its enduring appeal. While its intricate weave may appear complicated at first glance, creating your own French braid is an achievable feat for anyone willing to learn. Many have been mystified by its seemingly complex appearance, but the truth is, once you grasp the fundamental technique, it's surprisingly easy to do it yourself.
This comprehensive guide aims to demystify the art of the French braid, transforming you from a novice to a confident braider. We'll delve into its fascinating history, explore why it remains a beloved choice, provide step-by-step instructions, and uncover a myriad of stunning ways to wear it for any occasion. Whether you're aiming for a casual gym look or a sophisticated formal event, the French braid offers unparalleled versatility and charm. Get ready to unlock the secrets to this iconic hairstyle and elevate your hair game.
Table of Contents
- What Exactly is a French Braid?
- A Glimpse into History: The French Braid Through Time
- Why the French Braid Endures: Timeless Appeal and Versatility
- French Braid vs. Dutch Braid: Understanding the Difference
- Mastering the Classic French Braid: A Step-by-Step Tutorial
- Beyond the Classic: Stunning French Braid Variations
- Tips and Tricks for a Perfect French Braid
- Troubleshooting: Common French Braid Challenges
What Exactly is a French Braid?
At its core, a French braid is a specific type of hairstyle where all the hair is braided together to form one single, cohesive braid. Unlike a simple three-strand plait that starts with all the hair gathered at the nape, the French braid begins at the crown of the head. The braiding process starts at the forehead, then gradually incorporates more hair as it goes down the back of the head, creating a seamless, cascading look that flows downwards. This unique method of adding hair to each section as you braid is what truly differentiates French braids from plain plaits and elevates them into a more complex, yet incredibly elegant, style.
The result is an aesthetically gorgeous braid style that tons of women have fallen in love with. It appears intricately woven, hugging the scalp and showcasing the texture and length of the hair beautifully. This technique allows for a very secure and polished finish, making it a practical choice for activities while still maintaining a sophisticated appearance. It’s this blend of practicality and undeniable beauty that makes the French braid a staple in hairstyling.
A Glimpse into History: The French Braid Through Time
While commonly associated with France, the origins of the French braid are far more ancient and global than its name suggests. Evidence of similar braiding techniques has been found in ancient art and artifacts from various cultures, dating back thousands of years. For instance, rock art depicting women with braided hair, strikingly similar to a French braid, has been discovered in the Tassili n'Ajjer mountain range in Algeria, dating back as far as 6,000 years ago. Similar styles also appear in ancient Greek sculptures and Celtic art, suggesting a widespread and enduring human fascination with this intricate hair design.
So, why the "French" moniker? The phrase "French braid" itself appears to be a relatively modern invention in the English-speaking world. One of the earliest known literary mentions of the term "French braid" appears in an 1871 issue of *Arthur's Home Magazine*. It was used in a piece of short fiction titled "Our New Congressman" by March Westland, where it describes it as a new hairstyle, instructing, "do up your hair in that new French braid." This suggests that while the braiding technique itself was ancient, the specific terminology gained popularity in the Western world during the late 19th century, likely popularized by fashion trends emanating from Paris, which was then, as now, a global fashion capital. The French braid is undoubtedly one of the most amazing hairstyles that has stood out for decades, cementing its place in history not just as a passing trend, but as a timeless classic.
Why the French Braid Endures: Timeless Appeal and Versatility
The enduring popularity of the French braid is no accident. It possesses a unique combination of qualities that make it a favorite across generations and for countless occasions. Firstly, its inherent elegance is undeniable. It transforms simple hair into a complex, refined style that looks polished and put-together without appearing overly fussy. This makes it an ideal choice for a wide array of settings, from professional environments to formal celebrations.
Secondly, the French braid offers remarkable versatility. This hairstyle truly applies to all, regardless of hair type or texture, though some adjustments might be needed for very fine or very thick hair. It's elegant, effortless, and perfect for any occasion. Whether you're hitting the gym and need your hair securely out of your face, attending a casual brunch, or gracing a formal event like a wedding, a French braid fits seamlessly. Its ability to keep hair neatly contained while still looking chic is a major draw. Furthermore, it provides a fantastic base for various embellishments, from ribbons to delicate hairpins, allowing for personalized touches that can further elevate the style. The sheer range of adaptations, from a single classic braid to double French braids or even more elaborate combinations, ensures that this technique remains fresh and exciting.
French Braid vs. Dutch Braid: Understanding the Difference
While often confused, the French braid and the Dutch braid are distinct techniques that yield different visual effects. Both involve adding hair as you go, but the direction of the strands during the braiding process is what sets them apart. Understanding this key difference is crucial for mastering both styles and choosing the one that best suits your desired look.
The French Braid: Beneath It All
In a classic French braid, each new section of hair is crossed *over* the middle strand. This means that the braided segment itself tucks *underneath* the surrounding hair, creating a smooth, integrated appearance. The braid lies flat against the scalp, appearing to be woven into the hair, creating that signature cascading look that starts from the top of the head and flows downwards. It's a subtle yet sophisticated effect, where the braid appears to emerge from within the hair itself.
The Dutch Braid: Standing Out
A Dutch braid, otherwise known as an inverted French braid, operates on the opposite principle. Instead of crossing strands over, you cross them *under* the middle strand. This inversion causes the braided segment to pop *above* the hair, creating a raised, more pronounced effect. The braid is above the hair instead of beneath it like normal French braids, making it stand out more prominently against the scalp. This "3D" effect gives the Dutch braid a bolder, more voluminous appearance, often referred to as a "boxer braid" when done in pairs.
Why the Distinction Matters
Knowing the difference allows you to intentionally create the look you desire. If you want a sleek, integrated, and subtly elegant style, the French braid is your go-to. If you prefer a more dramatic, textured, and voluminous braid that stands out, the Dutch braid is the answer. Hairstylists often leverage these differences to achieve specific aesthetic goals, and with a little practice, you can too. Learning how to make your braid look fuller and more polished often involves understanding these nuances and adjusting your tension accordingly.
Mastering the Classic French Braid: A Step-by-Step Tutorial
Want to learn how to French braid with no experience? You're in the right place! Although its intricate weave may appear complicated, creating your own French braid is a skill that anyone can acquire. This step-by-step tutorial, with tips from hairstylists, will guide you through the process, making it effortless and chic. Remember, practice makes perfect! If you're looking for an affordable mannequin for practice, consider investing in one to hone your skills before tackling your own hair.
Preparation is Key
Before you begin, ensure your hair is tangle-free and slightly damp or treated with a light styling product for better grip. Hair that's too slippery or too dry can be challenging to braid. A wide-tooth comb and a hair elastic are your essential tools.
- Detangle Your Hair: Use a brush or wide-tooth comb to remove any knots. Smooth hair is easier to work with.
- Optional: Apply Product: A light mousse, braiding cream, or even a little hairspray can provide grip and control, especially for fine or layered hair.
- Gather Your Starting Section: Take a triangular section of hair from the crown of your head, right above your forehead. The size of this section will determine the starting width of your braid. This is where the braiding will start.
The Braiding Process
This is where the magic happens. I’ll show you how to section your hair and add new pieces as you go.
- Divide into Three Strands: Split your initial section of hair into three equal strands: left, middle, and right.
- Begin a Regular Braid: Cross the right strand over the middle strand. Then, cross the left strand over the new middle strand. You've just completed one pass of a regular three-strand braid.
- Incorporate New Hair (Right Side): Before crossing the right strand over again, gather a small, new section of loose hair from the right side of your head, adjacent to your existing right strand. Add this new hair to your right strand, combining them. Now, cross this combined, thicker right strand over the middle strand.
- Incorporate New Hair (Left Side): Similarly, before crossing the left strand over, gather a small, new section of loose hair from the left side of your head, adjacent to your existing left strand. Add this new hair to your left strand. Now, cross this combined, thicker left strand over the new middle strand.
- Continue Down the Head: Repeat steps 3 and 4, consistently adding small, equal sections of new hair from alternating sides as you work your way down the back of your head. Maintain consistent tension to ensure a neat and even braid. Remember, French braids differ from plain plaits as you add hair to each section as you braid, creating a cascading look that starts from the top of the head and flows downwards.
- Finish with a Regular Braid: Once you've incorporated all the loose hair from the sides of your head (usually around the nape of your neck), continue with a regular three-strand braid until you reach the ends of your hair.
Securing Your Braid
Once you've braided to your desired length, secure the end with a hair elastic. For a softer, fuller look, you can gently tug on the loops of the braid to loosen them, a technique often referred to as "pancaking" the braid. This can make your braid look fuller and more polished.
Beyond the Classic: Stunning French Braid Variations
The beauty of the French braid lies not just in its classic form but also in its incredible adaptability. Once you've mastered the basic technique, a world of creative possibilities opens up. Learn how to create a French braid and discover 30 stunning ways to wear it for any occasion. Master easy hairstyles with one, double, and front French braids. Here are just a few popular variations to inspire your next look:
- Double French Braids (Boxer Braids): This is arguably one of the most popular variations. Instead of one braid down the back, you part your hair down the middle and create two symmetrical French braids on either side of your head. This style is incredibly practical for workouts, yet stylish enough for casual outings.
- Front French Braid (Halo Braid/Crown Braid): This involves starting the French braid closer to your hairline and braiding it around your head, creating a "halo" or "crown" effect. It's an elegant choice for formal events and adds a touch of bohemian charm.
- Side French Braid: Instead of braiding straight down the back, start your French braid on one side of your head and angle it across to the opposite shoulder. This creates an asymmetrical, romantic look.
- French Braid Ponytail: Braid your hair in a French braid down to the nape of your neck, then gather the remaining hair into a ponytail. This offers a sleek, elevated ponytail.
- French Braid Bun: After French braiding your hair down to the nape, coil the remaining braided section into a bun, either low at the nape or higher on the crown.
- French Braid Updo: Incorporate French braiding into more elaborate updos, weaving sections of hair into braids that then form part of a larger, intricate style.
- Fishtail French Braids: For an even more intricate look, combine the French braiding technique with a fishtail braid. This means you're adding hair as you go, but instead of three strands, you're working with two sections, taking small pieces from the outer edges and crossing them to the opposite inner section. From double French braids to fishtail French braids, find your perfect style and get inspired by these photos.
Each variation offers a unique aesthetic, proving that the French braid is truly a versatile canvas for self-expression. Experiment with different starting points, tensions, and finishes to find your perfect style.
Tips and Tricks for a Perfect French Braid
Achieving a flawless French braid takes practice, but these expert tips from hairstylists can significantly improve your results and make the process smoother:
- Start with Slightly Textured Hair: Freshly washed, super-slippery hair can be hard to grip. Day-old hair or hair prepped with a texturizing spray, dry shampoo, or mousse provides better friction and hold.
- Maintain Consistent Tension: This is perhaps the most crucial tip. Uneven tension leads to a lumpy or loose braid. Try to keep an even pull on all three strands as you braid. Practice helps build muscle memory for this.
- Take Small, Even Sections: When adding new hair, ensure the sections you pick up are small and of equal size. This creates a smooth, uniform braid. Large, uneven sections will make the braid look messy and less polished.
- Use a Mirror (or Two): When braiding your own hair, using a mirror to see the back of your head can be immensely helpful, especially when you're starting out. Two mirrors (one in front, one behind) offer the best view.
- Keep Your Hands Close to Your Head: The closer your hands are to your scalp, the tighter and neater your braid will be. Letting your hands drift away can result in a loose, gappy braid.
- Angle Your Hands: As you braid down the head, angle your hands downwards to follow the natural curve of the head. This helps the braid lie flat and conform to the scalp.
- "Pancake" for Volume: Once the braid is secured, gently pull on the outer loops of the braid to loosen them and create a fuller, wider appearance. This technique is excellent for making fine hair look more voluminous and gives the braid a softer, more romantic feel. This is a great tip on how to make your braid look fuller and more polished.
- Practice on a Mannequin: If you're struggling to braid your own hair, practicing on a mannequin head can be incredibly beneficial. It allows you to see your work from all angles and develop the necessary hand movements without the awkwardness of reaching behind your head. Looking for an affordable mannequin for practice? Many beauty supply stores or online retailers offer them.
- Finish with Hairspray: A light mist of hairspray once the braid is complete will help tame any flyaways and keep your style in place all day.
Troubleshooting: Common French Braid Challenges
Even with the best instructions, you might encounter some common hurdles when learning to French braid. Don't get discouraged – these are all part of the learning process!
- Lumpy or Uneven Braid: This is almost always due to inconsistent tension or uneven sections of hair. Focus on taking small, equal sections and maintaining a firm, steady grip on all three strands throughout the process.
- Hair Falling Out of the Braid: This can happen if your hair is very layered, too slippery, or if you're not incorporating new sections tightly enough. Use a light styling product for grip, and ensure you're adding new hair firmly into the existing strands. For very layered hair, a tighter braid or using bobby pins to secure stray pieces might be necessary.
- Difficulty Reaching the Back of Your Head: This is a common physical challenge. Practice helps build dexterity. Try braiding in front of a mirror or two, or practice on a friend or a mannequin head first to get the hand movements down. Some people find it easier to lean their head forward slightly to get a better angle.
- Braid Looks Too Flat or Thin: If you desire more volume, remember the "pancaking" technique mentioned earlier. Also, ensure you're not pulling the braid *too* tight against the scalp. Sometimes, a slightly looser initial tension can allow for more volume later.
- Starting Section is Messy: The very first section you pick up sets the foundation. Ensure it's clean, smooth, and free of tangles before you divide it into three. Using a fine-tooth comb to define this initial section can help.
Remember, the French braid is such a classic hairstyle, and once you know how, it's easy to do it yourself. It just takes patience and consistent effort. Keep practicing, and you'll be creating elegant, effortless French braids in no time.
The French braid is undoubtedly the most amazing hairstyle that has stood out for decades, offering a blend of elegance, practicality, and timeless appeal. From its ancient roots to its modern interpretations, it continues to be a go-to choice for those seeking a polished yet versatile look. We hope this comprehensive guide has empowered you to master this beautiful technique and explore the many stunning ways to wear it.
Now that you're equipped with the knowledge and steps to create your own French braid, it's time to put theory into practice! Don't be afraid to experiment with different variations and find the styles that best suit your hair and personality. Share your French braid journey with us in the comments below – we'd love to hear your tips, tricks, and favorite ways to wear this iconic style. If you found this article helpful, consider sharing it with friends and family who are also looking to elevate their hair game. Explore more of our hairstyling guides for further inspiration!
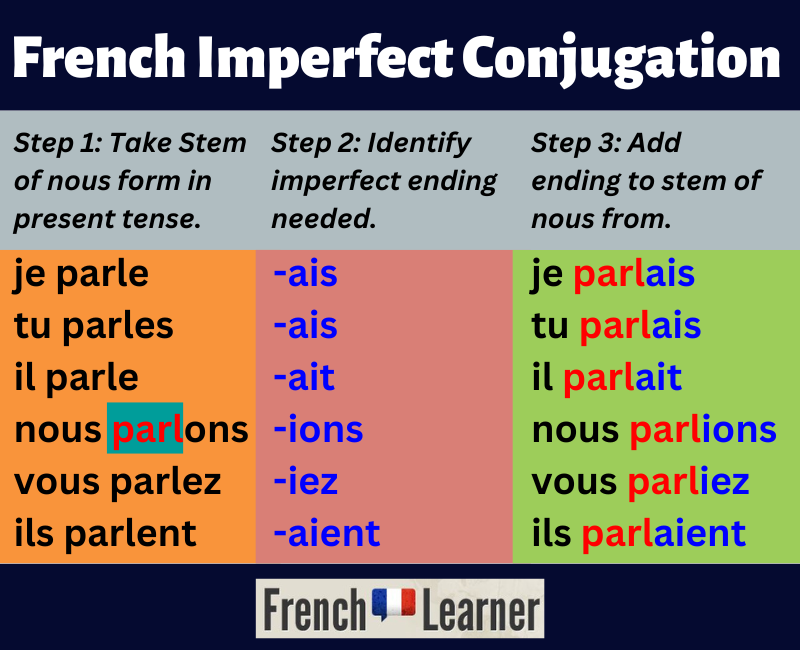
french-imperfect-conjugation | FrenchLearner.com

How To Learn French - 9 Tips From A French Tutor | City Lit
French For Beginners: 10 Tools To Help You Get Started Today
