Mastering The French Braid: Your Ultimate Guide To Timeless Elegance
The French braid stands as a quintessential hairstyle, renowned for its intricate appearance yet surprisingly achievable technique. For many, the sight of a perfectly woven French braid might evoke a sense of mystification, making it seem like a skill reserved for professional stylists. However, the truth is far more liberating: creating your own French braid is a skill well within reach, even for those with no prior braiding experience. This classic look, which elevates simple plaits into a cascading masterpiece, has graced heads for centuries, proving its enduring appeal.
From casual everyday wear to sophisticated formal events, the versatility of the French braid is unmatched. It’s a style that always looks classy and cute, seamlessly transitioning from weekend shopping to a wedding or a glamorous night out on the town. This comprehensive guide will demystify the process, offering step-by-step instructions, expert tips, and a plethora of style inspirations to help you master this elegant hairdo and discover the perfect French braid for any occasion.
Table of Contents
- What Exactly is a French Braid? Unraveling the Classic
- French Braid vs. Dutch Braid: Knowing the Difference
- Getting Started: Essential Tools for Your French Braid Journey
- The Step-by-Step Guide to Creating Your Own French Braid
- Beyond the Basic: Exploring Diverse French Braid Styles
- Tips & Tricks for Flawless French Braids
- French Braids for Every Occasion: Versatility Unleashed
- Common French Braid Challenges and How to Overcome Them
What Exactly is a French Braid? Unraveling the Classic
A French braid is a certain type of hairstyle wherein all the hair is braided together to form one single braid. Unlike a plain plait, which typically begins with three sections of hair from the nape of the neck or a ponytail, French braids differ significantly. The defining characteristic of a French braid is that you continuously add hair to each section as you braid, creating a seamless, cascading look that starts from the top of the head and flows downwards. The braiding will typically start at the forehead, incorporating strands from the sides, then it goes down at the back of the head, tapering into a traditional three-strand braid or bun. This continuous incorporation of hair is what elevates simple braids into a complex style, giving the French braid its distinctive elegant and sophisticated appearance. The history of the French braid is quite fascinating, with its origins often debated. While the name suggests a French genesis, similar braiding techniques have been found in ancient cultures worldwide. However, the phrase "French braid" itself appears to have gained popularity in the Western world relatively recently. For instance, the phrase French braid appears in an 1871 issue of Arthur's Home Magazine, used in a piece of short fiction titled "Our New Congressman" by March Westland. The story describes it as a new hairstyle, with the line, "do up your hair in that new French braid." This historical mention indicates that by the late 19th century, the French braid was recognized and trending, solidifying its place as a classic.French Braid vs. Dutch Braid: Knowing the Difference
While often confused, the French braid and the Dutch braid are distinct styles, though they share a similar foundational technique. Understanding their difference is key to mastering both and achieving your desired look. A Dutch braid, otherwise known as an inverted French braid, is essentially a French braid where the strands are crossed *under* the middle section, rather than over. This subtle change in technique creates a dramatically different visual effect. In a traditional French braid, the strands are crossed *over* the middle section, causing the braid to lie flat against the head, appearing as if it's "sunk into" the hair. The braid is beneath the hair, creating a smooth, integrated look. Conversely, with a Dutch braid, the braid is above the hair instead of beneath it like normal French braids. This makes the braid pop out from the head, creating a more pronounced, almost three-dimensional effect, often referred to as a "reverse braid" or "boxer braid" when done in pairs. Knowing this distinction is crucial when you want to make your braid look fuller and more polished. For instance, if you desire a more voluminous, statement braid, the Dutch braid might be your go-to. However, for a sleek, understated elegance, the classic French braid remains unparalleled. Both techniques offer incredible versatility, and mastering one often makes learning the other much easier.Getting Started: Essential Tools for Your French Braid Journey
Embarking on your French braid journey requires only a few fundamental tools, proving that elegance doesn't always demand an extensive kit. Having the right hair braiding tools will help you maintain the look and ensure a smoother, more polished result. Here's what you'll need: * **A Fine-Tooth Comb or Rat-Tail Comb:** Crucial for creating clean, precise sections, which is the cornerstone of a neat French braid. The rat-tail end is particularly useful for parting hair. * **Hair Ties or Elastics:** To secure the end of your braid. Clear elastics are often preferred for a discreet finish, especially for intricate styles. * **Hair Clips or Sectioning Clips:** These are invaluable for holding unbraided sections of hair out of the way, preventing tangles and allowing you to focus on one section at a time. * **Spray Bottle with Water (Optional):** A light mist of water can help tame flyaways and make hair more manageable, especially if it's very fine or prone to static. * **Light-Hold Hairspray or Texturizing Spray (Optional):** To set the braid, add texture, or provide extra grip, particularly for slippery hair. * **Hair Brush:** To detangle your hair thoroughly before you begin. A smooth canvas is essential for a smooth braid. For those who are serious about honing their braiding skills, especially if you want to learn how to French braid with no experience, investing in a practice mannequin head can be incredibly beneficial. As @getglamfam suggests, looking for an affordable mannequin for practice can provide a no-pressure environment to perfect your technique before attempting it on yourself or others. This allows you to experiment with sectioning, tension, and adding pieces without the strain of holding your arms up or working blind.The Step-by-Step Guide to Creating Your Own French Braid
Although its intricate weave may appear complicated, creating your own French braid is a rewarding skill that, once mastered, becomes surprisingly simple. This tutorial will show you how to French braid, breaking down the process into five easy steps with tips from hairstylists. Remember, practice makes perfect, and even if it doesn't look flawless on your first try, you're on your way to mastering this classic style. **Step 1: Prepare Your Hair** Start with clean, detangled hair. While some prefer freshly washed hair, others find that hair that hasn't been washed for a day or two holds braids better, offering more grip. If your hair is very smooth, a little texturizing spray or dry shampoo can add some grip. Brush out any knots thoroughly to ensure a smooth braiding process. **Step 2: Create Your Initial Section** Using your comb, part a triangular or square section of hair from the crown of your head, right at the top. This section should be about 2-3 inches wide, depending on your hair thickness and desired braid size. This will be the starting point of your French braid. **Step 3: Begin the Basic Braid** Divide this initial section into three equal smaller strands. Hold the left strand in your left hand, the right strand in your right hand, and the middle strand between your thumb and forefinger of either hand. Now, begin a standard three-strand braid by crossing the right strand over the middle strand, then crossing the left strand over the new middle strand. This forms the first "weave" of your braid. **Step 4: Incorporate New Hair (The French Braid Technique)** This is where the magic of the French braid happens. After you've made your first basic braid stitch: * **For the right side:** Before crossing the rightmost strand over the middle, pick up a small, equal section of loose hair from the right side of your head (just below your initial section). Add this new hair to the rightmost strand you are about to cross over. Now, cross this combined, thicker right strand over the middle strand. * **For the left side:** Repeat the process on the left. Pick up a small, equal section of loose hair from the left side of your head. Add this new hair to the leftmost strand. Now, cross this combined, thicker left strand over the new middle strand. Continue this process, alternately adding hair from the right and left sides to your active braiding strands, always crossing them over the middle. I’ll show you how to section your hair, add pieces as you braid, and keep consistent tension throughout. **Step 5: Finish the Braid** Once you've incorporated all the loose hair from the sides of your head (usually around the nape of your neck or just below your ears), continue braiding the remaining hair down to the ends as a standard three-strand braid. Secure the end with a hair tie. You can gently tug on the loops of the braid to loosen it slightly and create a fuller, softer look, or leave it tight for a sleek finish.Mastering the Art of Sectioning for a Perfect French Braid
Clean, even sections are the secret to a neat and polished French braid. If your sections are uneven, the braid will appear lopsided or messy. When starting, ensure your initial top section is symmetrical and proportionate to your head size. As you add hair in Step 4, strive to pick up equal amounts of hair from each side. Imagine drawing a clean line with your finger or comb each time you grab new hair. This consistency will ensure your braid grows evenly and beautifully down your head.Maintaining Tension: The Secret to a Polished French Braid
Consistent tension is paramount for a French braid that holds its shape and looks polished. Too loose, and the braid will unravel or look messy. Too tight, and it can be uncomfortable or appear rigid. The trick is to maintain a firm but gentle grip on your strands throughout the entire process. As you cross strands over and add new hair, keep a slight pull on the working strands. Your fingers should feel the hair taut, but not painfully so. This consistent tension ensures each weave is secure and uniform, contributing to the overall sleekness and longevity of your French braid.Beyond the Basic: Exploring Diverse French Braid Styles
Once you've mastered the foundational technique of the classic French braid, a world of stunning variations opens up. French braids elevate simple braids into a complex style, and with a little creativity, you can discover 30 stunning ways to wear it for any occasion. From double French braids to fishtail French braids, you can find your perfect style and get inspired by these photos. You can learn how to make various French braid styles for different hair types and occasions, ensuring you always have a chic option at your fingertips.Double French Braids and Pigtail Perfection
One of the most popular variations is the double French braid, often referred to as French braid pigtails or boxer braids. Instead of braiding all the hair into one central braid, you part your hair down the middle from front to back, creating two equal sections. Then, you create a French braid on each side, starting from the front hairline and working your way down. This style is incredibly versatile, offering a sporty yet chic look for active days, or a cute, youthful vibe for casual outings. You can finish them with simple elastics, or wrap them into buns for a more sophisticated double bun look.Side French Braids and Fishtail French Braid Variations
For a softer, more romantic look, consider a side French braid. This involves starting your French braid from one side of your head, sweeping across the crown and down over one shoulder. It's an elegant option for formal events or when you want to showcase intricate details on one side of your hair. Another captivating variation is the fishtail French braid. This style combines the French braiding technique of adding hair with the intricate weave of a fishtail braid. Instead of three strands, a fishtail braid uses two, with small sections continuously pulled from the outer edges and crossed over to the opposite side. When integrated into a French braid, you start with the French braiding technique, incorporating new hair, but then you transition into the two-strand fishtail weave as you move down the head. This creates a highly textured, almost ethereal look. You can also see pictures of pigtail, two, side, fishtail, and more French braids with weave, ponytail, and bun options, showcasing the sheer adaptability of this style. Furthermore, for those with different hair textures, such as popular French braid styles for black hair, specific techniques can be employed to ensure the braid is smooth, protected, and lasts longer. This might involve using specific products, tension, or even incorporating braiding hair extensions. There’s a technique to using braiding hair so your hairstyle doesn’t end up looking tacky, ensuring a seamless and natural blend. Mastering easy hairstyles with one, double, and front French braids truly expands your hair styling repertoire.Tips & Tricks for Flawless French Braids
Today’s edition of fun with French braids is one for tips lovers. That’s because we’ve got a collection of little-known techniques we came across and wanted to share, helping you achieve flawless results every time. This article is the perfect complement for our look into ways to hold your hair while French braiding that also reveals other must-know tips and tricks. * **Prep is Key:** Ensure your hair is completely detangled before you start. A smooth canvas prevents snags and ensures a clean braid. For extra grip, especially on freshly washed, slippery hair, apply a light mist of dry shampoo or texturizing spray. * **Work with Damp Hair (Optional):** Some find that slightly damp hair (not wet!) is easier to work with, as it reduces flyaways and provides more control. A light spritz of water from a spray bottle can do wonders. * **Use a Mirror (or Two):** If you're braiding your own hair, using two mirrors (one in front, one behind) can give you a better view of the back of your head, helping you maintain even sections and tension. * **Small Sections, Big Impact:** When adding new hair, take small, even sections. This creates a more intricate and polished look. Large sections can make the braid appear chunky and less refined. * **Keep Your Hands Close to Your Head:** This helps maintain control and tension, ensuring the braid stays close to the scalp. If your hands drift too far away, the braid might become loose or messy. * **Practice Your Grip:** Experiment with how you hold the three strands. Some prefer to use their index and middle fingers to separate the strands, while others might use their thumb and forefinger. Find what feels most comfortable and gives you the most control. * **Don't Be Afraid to Undo:** If a section isn't quite right, it's better to undo a few stitches and re-braid than to continue with a mistake. Patience is a virtue in braiding. * **For Volume:** Once your braid is complete, gently tug on the outer loops of each section. This "pancaking" technique loosens the braid and creates the illusion of thicker, fuller hair. * **Secure with Care:** Use a good quality hair elastic that won't snag or break your hair. For a seamless look, you can wrap a small strand of hair around the elastic and secure it with a bobby pin. * **Tame Flyaways:** A light application of hairspray or a dab of hair gel on your fingertips can smooth down any stray hairs around your hairline or along the braid. * **Consider Hair Type:** For very fine hair, slightly backcombing the roots before starting can add volume and grip. For thick or curly hair, ensure it's thoroughly detangled and perhaps slightly straightened at the roots to make sectioning easier.French Braids for Every Occasion: Versatility Unleashed
The French braid is such a classic hairstyle, and once you know how, it's easy to do it yourself, making it suitable for virtually any event. A French braid always looks classy and cute, and although it seems complicated, it’s pretty simple once you get the steps down. This tutorial will show you how to French braid as well as which hair braiding tools will help you maintain the look, whether it’s for weekend shopping, a wedding or a night out on the town. * **Casual Chic:** For everyday wear, a single, slightly messy French braid starting from the crown and flowing down your back offers an effortlessly chic look. It keeps hair out of your face while adding a touch of elegance to your casual attire. Double French braids are also perfect for a sporty yet stylish vibe, ideal for errands, gym sessions, or brunch with friends. * **Professional Polish:** A sleek, tightly woven French braid, perhaps ending in a low bun or a neat ponytail, exudes professionalism and competence. It's an excellent choice for work, interviews, or any formal business setting where you need your hair to be neat and out of the way. * **Romantic & Elegant (Weddings & Formal Events):** French braids can be incredibly romantic. A loose, slightly pulled-apart French braid woven into an updo, or a side French braid adorned with delicate flowers or hairpins, is perfect for weddings, proms, or other formal gatherings. The intricate weave adds sophistication without being overly fussy. * **Playful & Fun (Parties & Festivals):** Experiment with multiple smaller French braids, or incorporate colorful ribbons into your braids for a festive look. Fishtail French braids or braids that transition into high ponytails can add a playful edge to your party ensemble. * **Active Lifestyle:** For sports or outdoor activities, a tight French braid (or double French braids) is incredibly practical. It keeps all your hair securely in place, preventing tangles and distractions, allowing you to focus on your activity. The beauty of the French braid lies in its adaptability. You can dress it up with accessories, pull out face-framing pieces for a softer look, or keep it tight and neat for a polished finish. Its timeless appeal ensures it remains a go-to style for anyone seeking both practicality and elegance.Common French Braid Challenges and How to Overcome Them
While the French braid is accessible, beginners often encounter a few common hurdles. Knowing how to troubleshoot these issues can save you frustration and lead to a more successful braiding experience. * **Uneven Sections:** This is perhaps the most common issue. If your braid looks lopsided or wider on one side, it's likely due to unevenly picked-up sections of hair. * **Solution:** Take your time. Use a fine-tooth comb to create precise, consistent partings when adding new hair. Practice makes perfect here; the more you do it, the better your eye will become at judging equal sections. * **Loose or Slipping Braid:** If your braid feels like it's falling apart or not staying close to the scalp, you might not be maintaining enough tension. * **Solution:** Keep a firm, consistent grip on your strands. As you cross strands over and add new hair, ensure there's a gentle pull. Your fingers should stay close to your head. For very slippery hair, a little texturizing spray or dry shampoo at the roots before you start can provide extra grip. * **Flyaways and Frizz:** Stray hairs popping out, especially around the hairline or along the braid, can make the style look messy. * **Solution:** Start with well-moisturized and detangled hair. Use a small amount of styling cream, gel, or a light hairspray on your fingertips to smooth down flyaways as you braid. A fine-tooth comb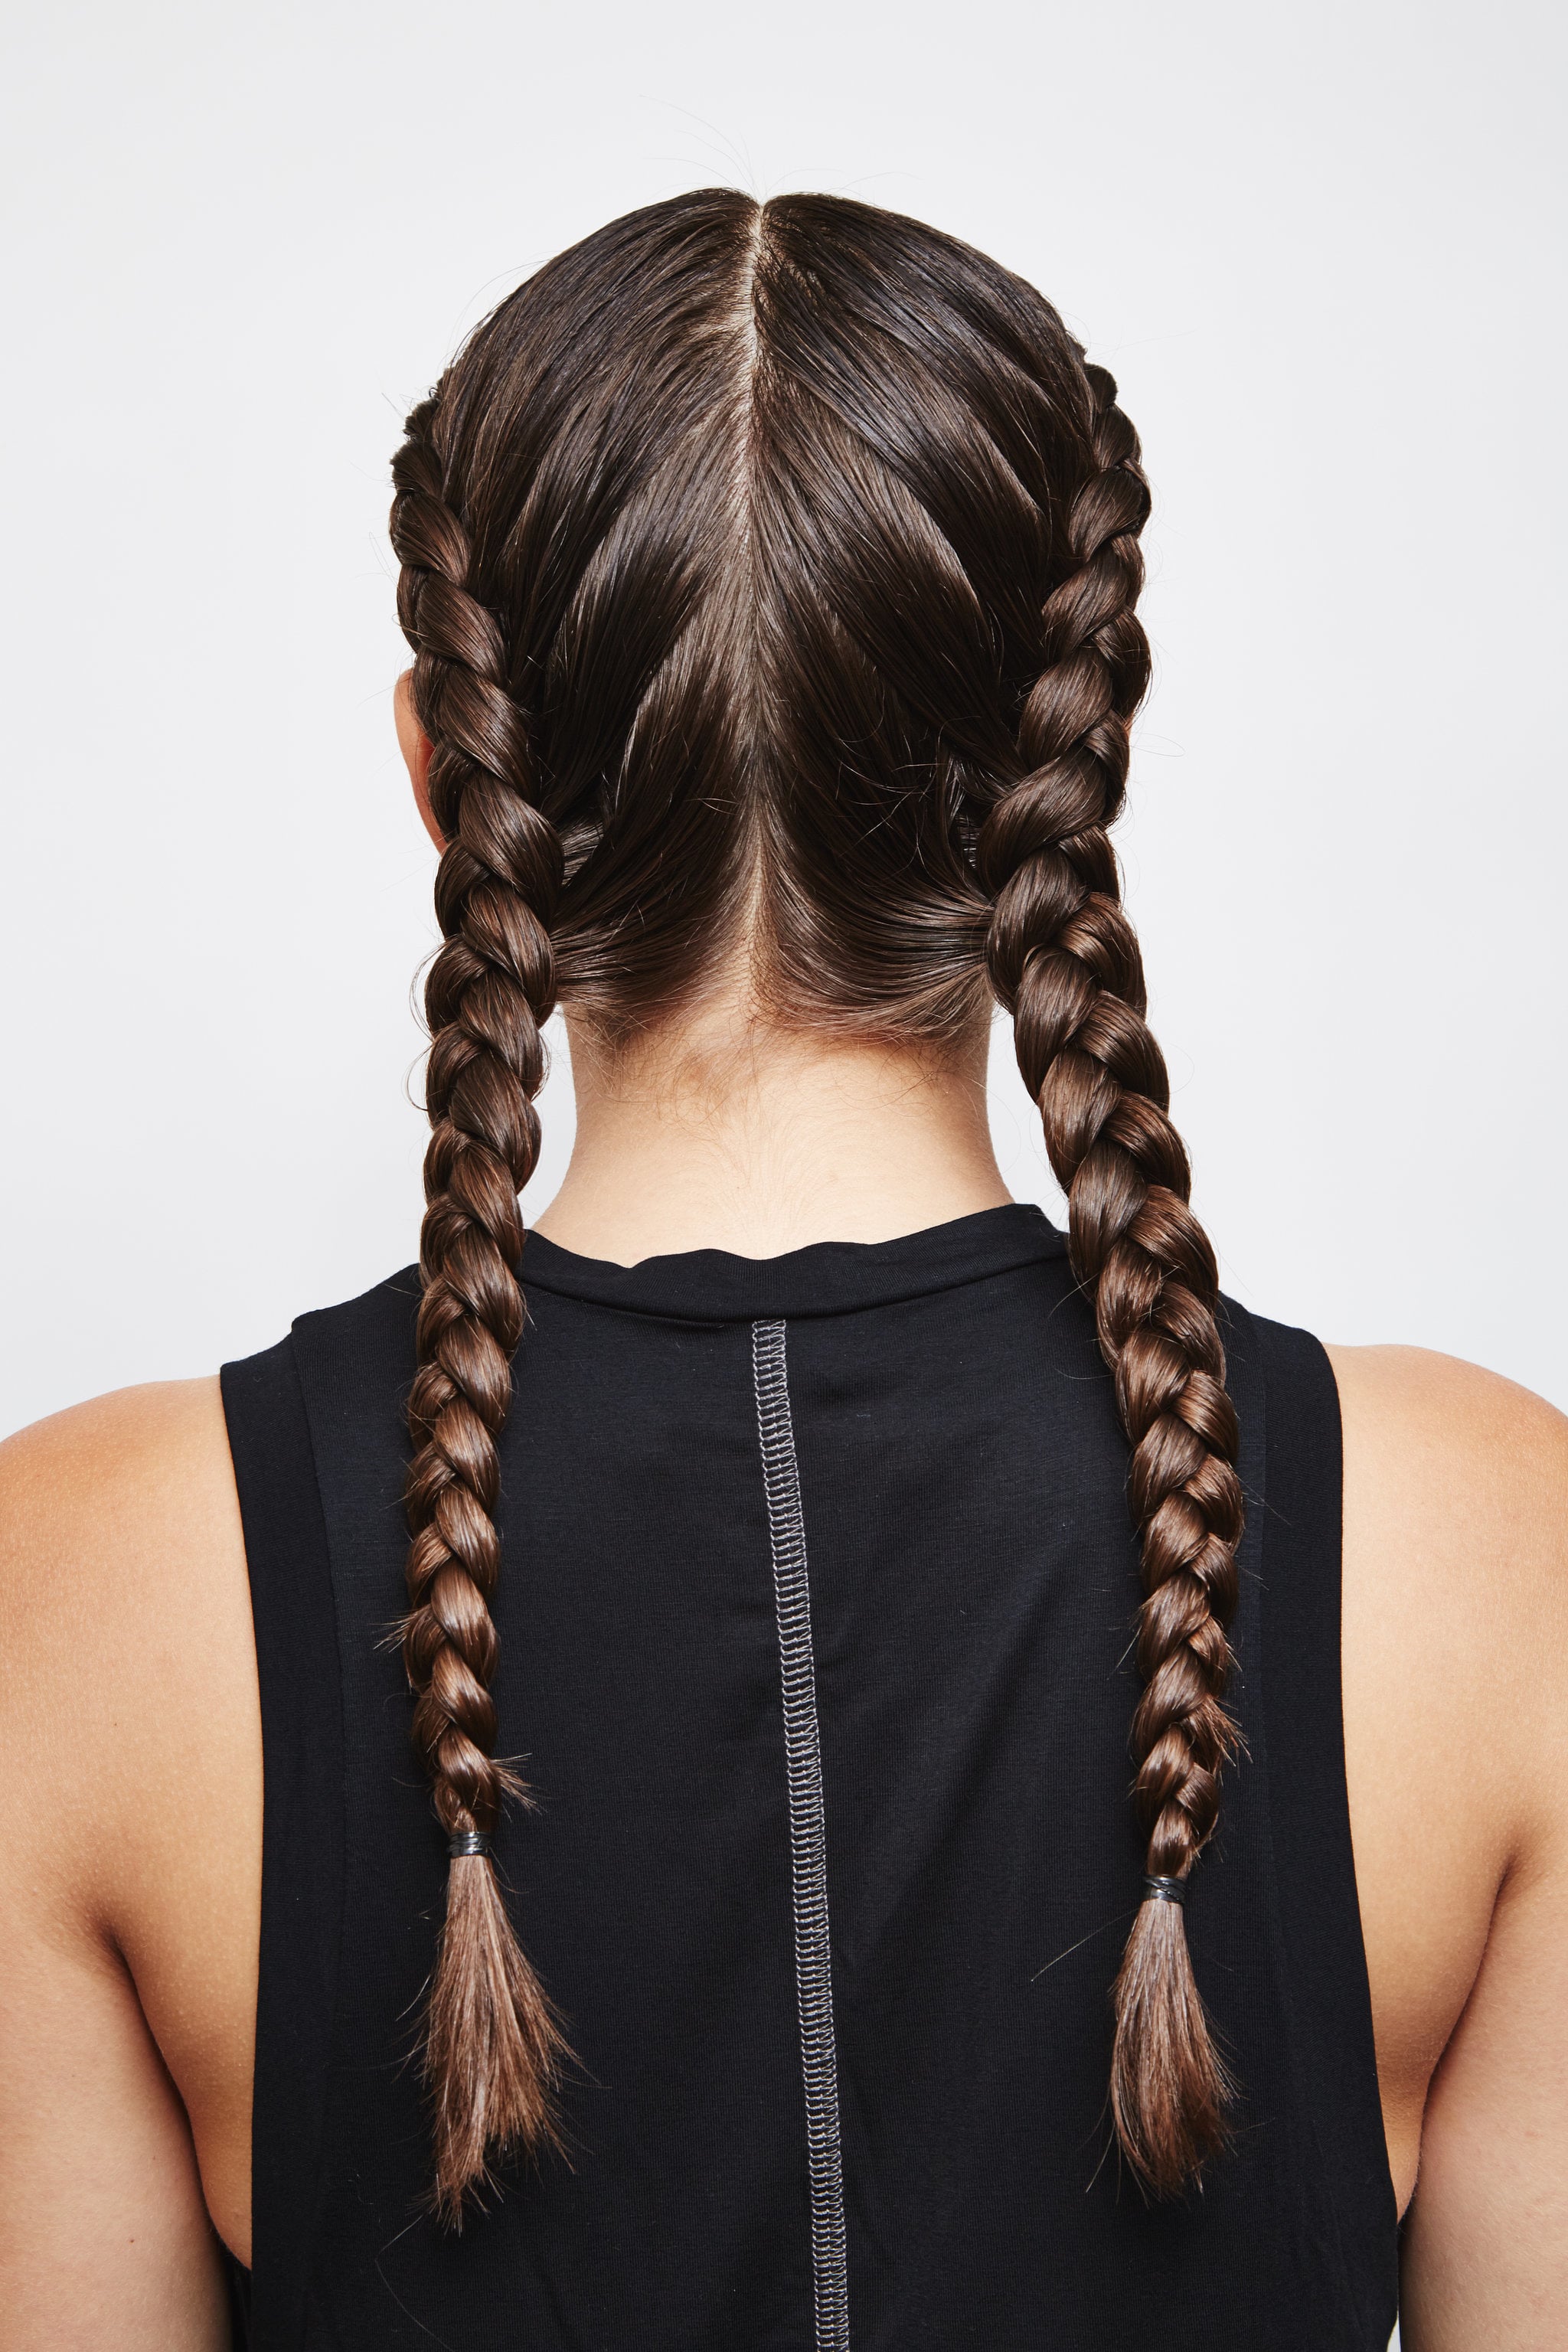
The History of the French Braid | POPSUGAR Beauty

10+ Two French Braid Styles | Fashion Style

21 French Braid Hairstyles - All You Need to Know About French Braids
